Introduction
In the world of application development, security is not simply a bonus or a peripheral concern—it’s a core responsibility, an uncompromising duty. As developers, we don’t just build features and design interfaces. We act as the first line of defense against data breaches and system vulnerabilities. This responsibility falls upon us as the trusted guardians of user data and integrity.
In our pursuit of security, one standard stands tall: OAuth2. By self-hosting, we can take full control of our security situation, leaving no stone unturned in our quest for secure operations.
In this article, I’ll relay my experiences in fortifying a web application using OAuth2 for authentication, Keycloak for identity and access management, the reliable Spring framework at the back-end, and the flexible Vaadin for our front-end view.
For those embarking on this journey, it’s important to remember that each adventure is unique. Each application has its own peculiar needs and challenges. To help you navigate your path, you’ll find practical, adaptable code snippets scattered throughout this article.
Understanding The Applications

When it comes to application development, most of us aren’t just coding for a paycheck—we’re often building tools to fulfill our personal needs. Take this system we’re discussing, for example. Its birth was sparked by my desire to have remote access to a set of information that I had meticulously compiled on my local machine. My data? An exhaustive study of various stocks. The mission? Display the predicted price of each stock a year from now, compared with its current price.
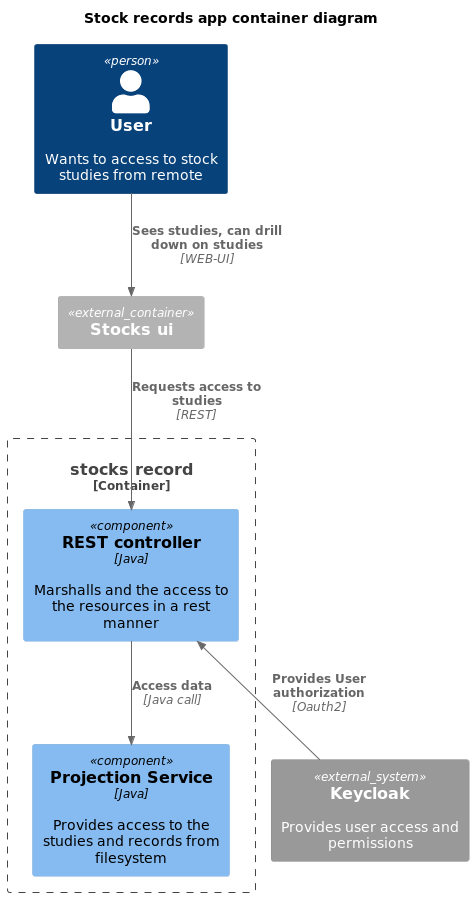
Keycloak, a standalone authentication and authorization server, is like an outsider yet an integral part of our system, handling the crucial aspect of security.
Our system itself splits into two main components:
stock-records, our resource server, serves as the knowledge hub of our system. It holds the studies, feeding our client with up-to-date data regarding various stocks.stocks-ui, our client, acts as the visual mouthpiece of the system. It effectively communicates the state of different stocks, their forecasted price, the rate of change, and the present price.
This division offers a clear separation of concerns, keeping the system clean and streamlined.
The plantuml text diagram of the previous
Setting Up Our Environment
Configuring our environment essentially involves setting up the apps in Keycloak.
I have a realm in Keycloak—the playground where my apps live. This realm is a testing one, perfect for our experimentation.
Setting up involves creating two applications, securing their app IDs and secrets, establishing their callback URLs, and a few other minor tweaks.
Some of the significant tweaking happens in the resource server. I’ve defined a new scope for authorization and, purely for testing purposes, authorized the “password” OAuth2 flow for the resource app. This just makes my life a bit easier during integration testing stages, but don’t even think about leaving this setting on for production—it’s a big no-no! A separate environment should always be reserved for development and production.
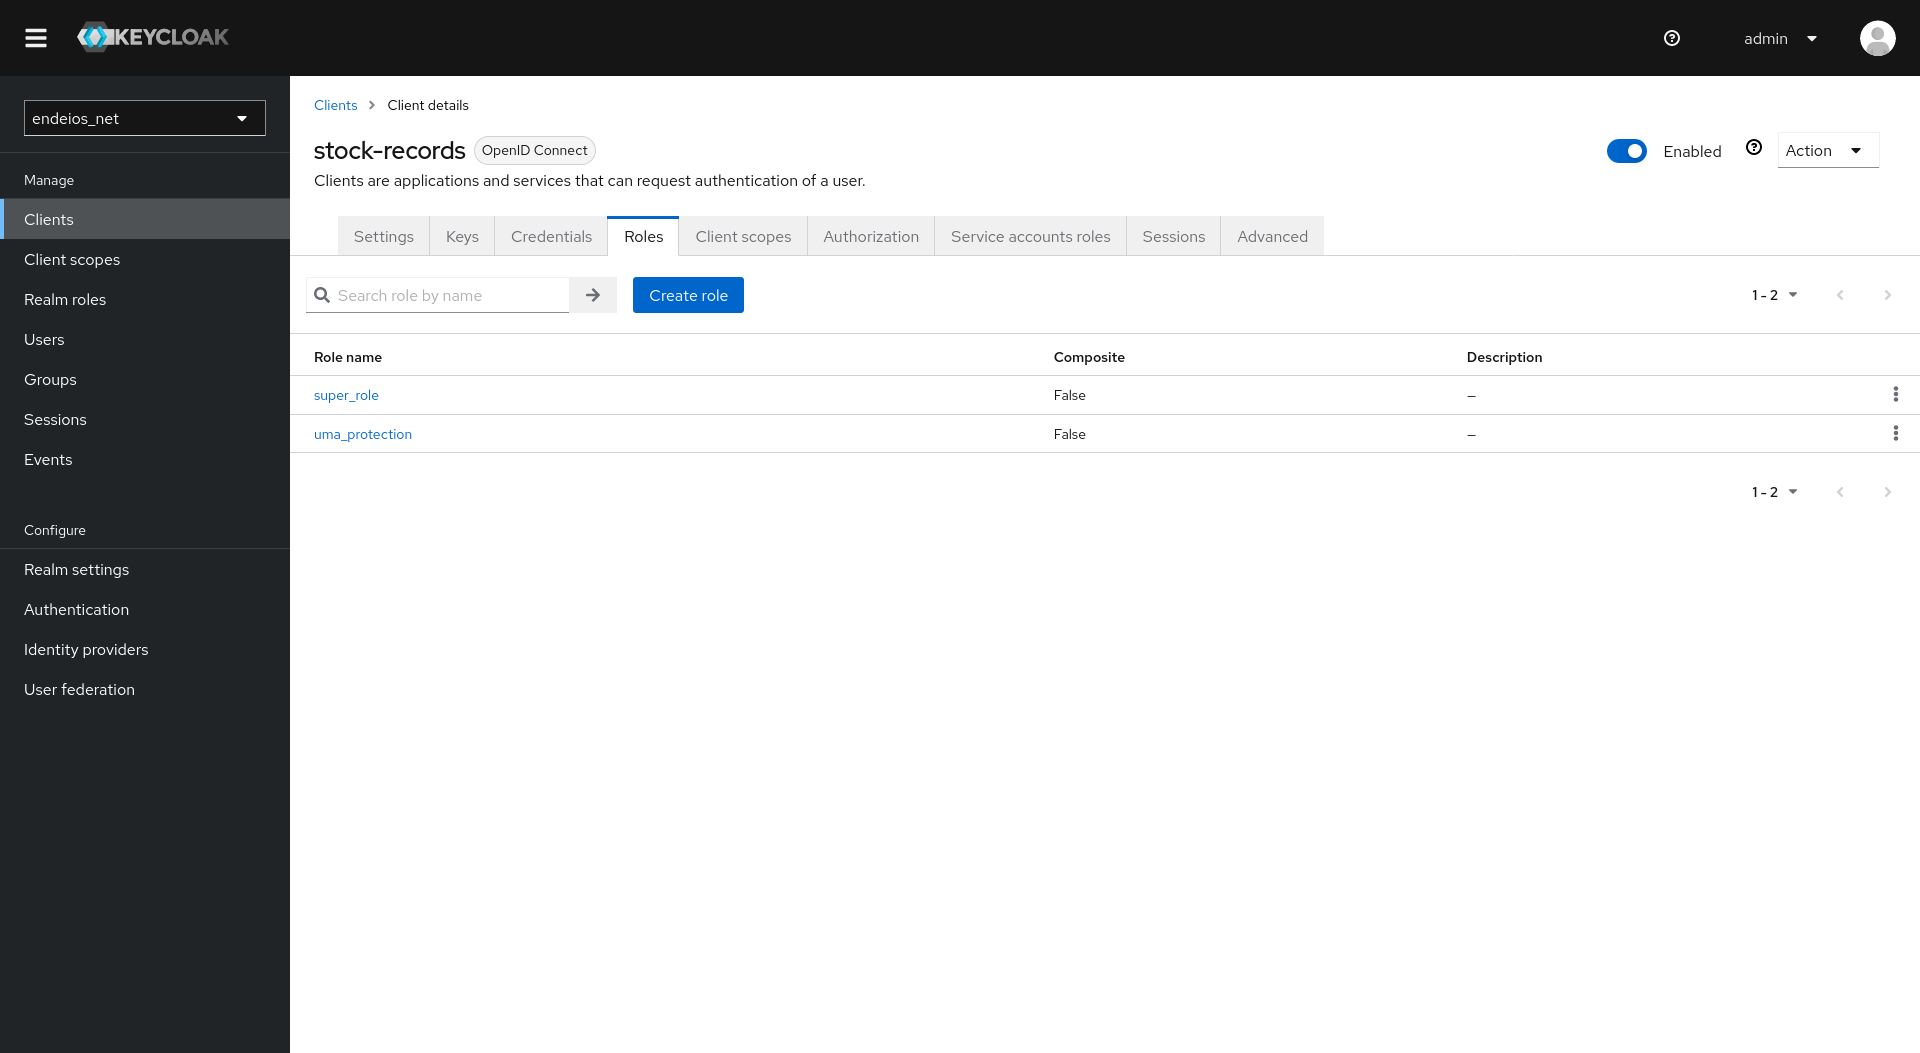
Setting the Resource Server
The resource server is set as a trusted app, with password-flow settings for smoother integration testing.

Here’s how you add a role to the app:
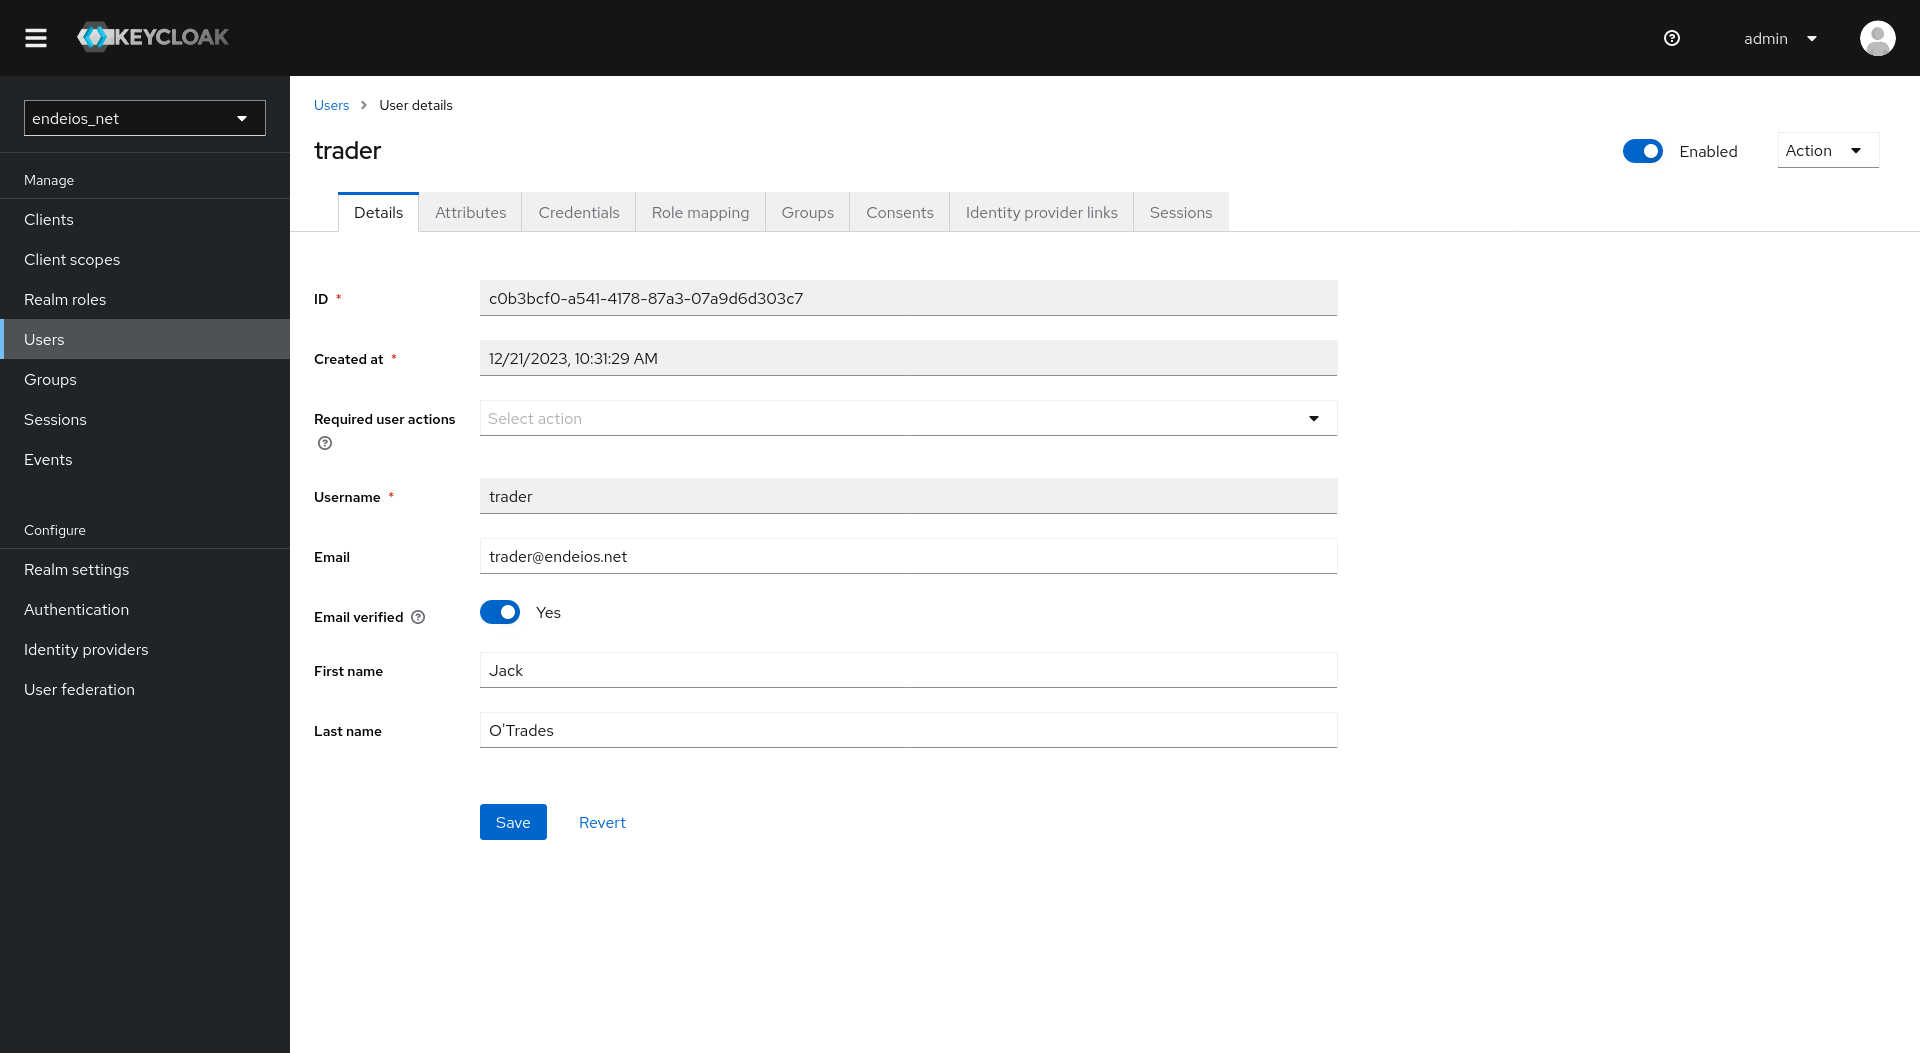
Setting Up the User
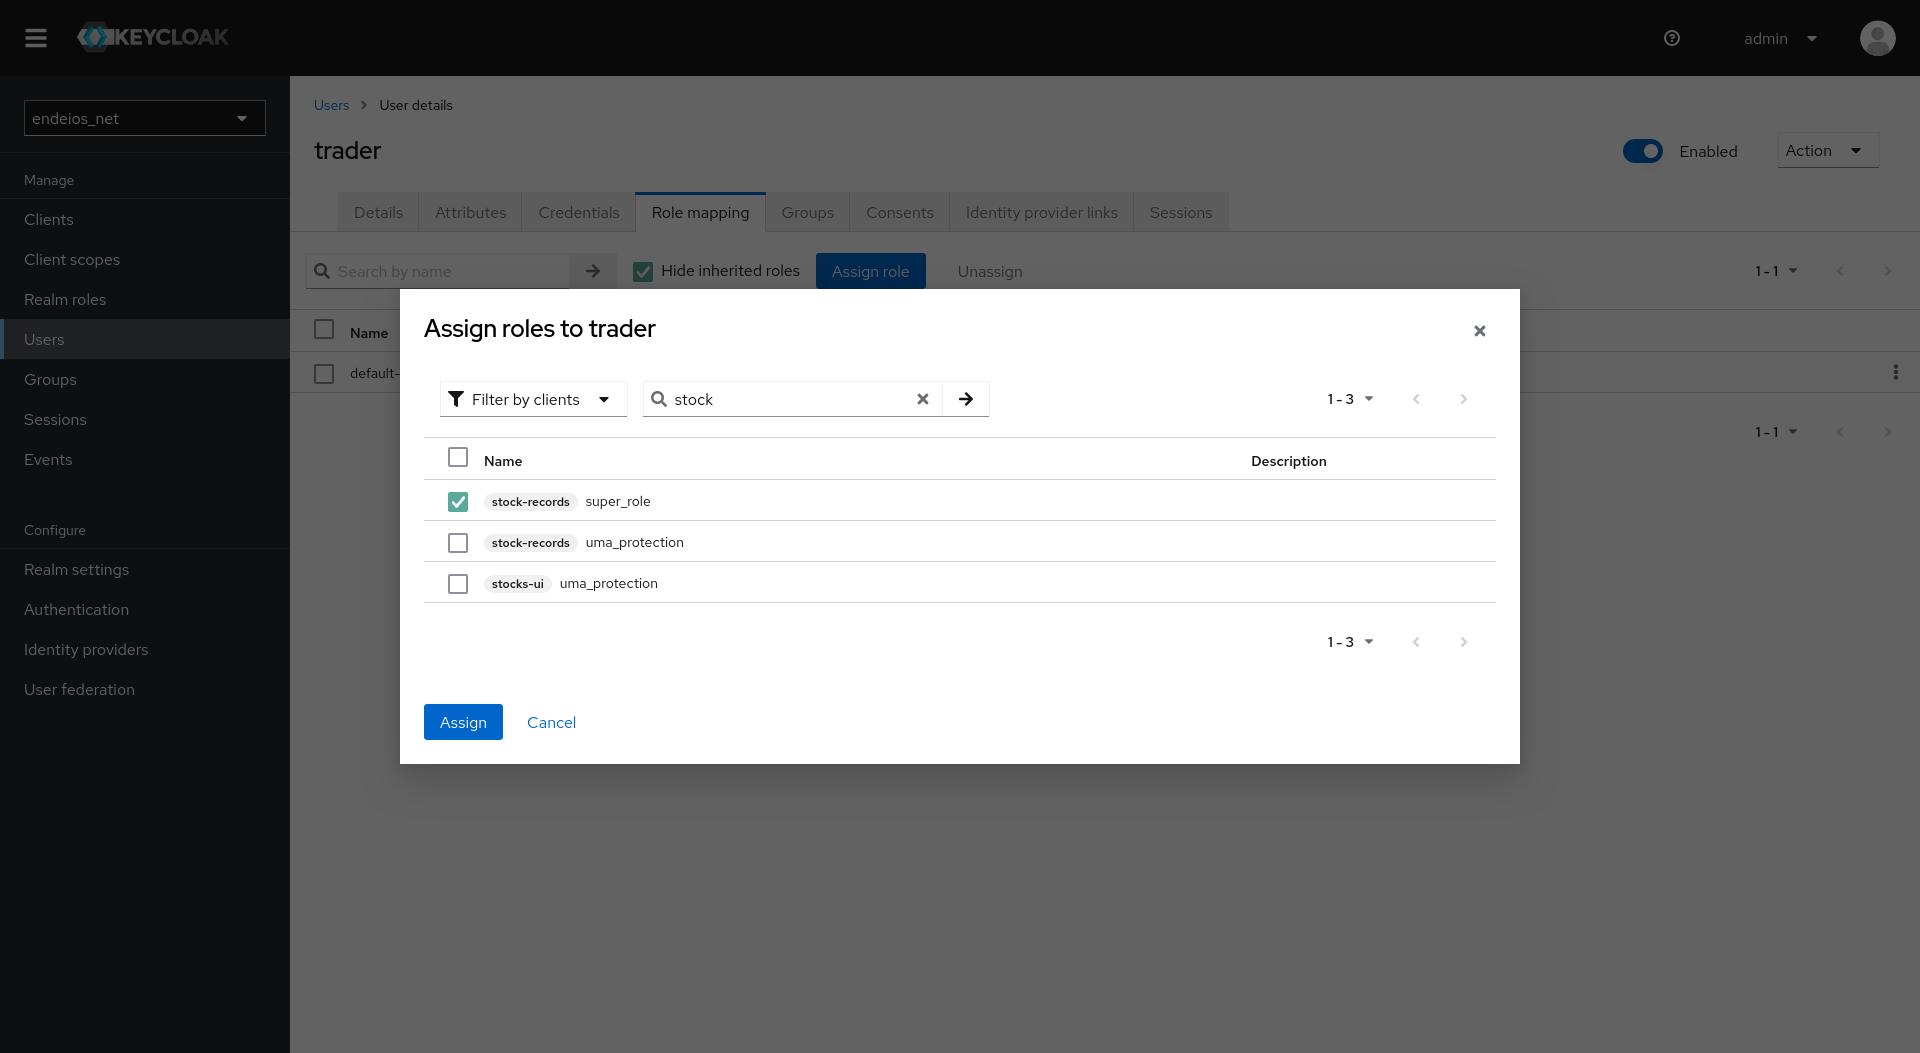
Setting up a user can get a bit tricky. Beyond creating the user, we need to assign it to the necessary role in the app.
Here’s how to assign a role to the user:
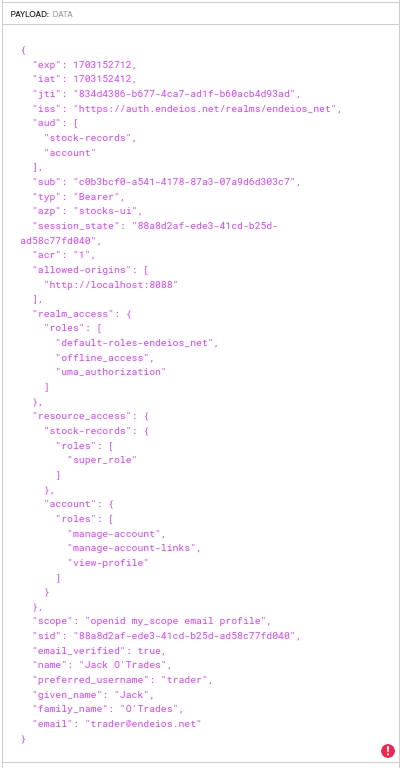
This is how a token for a trader looks like:
Setting Up the UI
Nothing much of interest here—it’s just a standard Keycloak app setup. If you’re feeling adventurous (or if you’re dealing with long tokens), you might want to tweak the scopes a bit or create custom ones. Interesting as that sounds, we won’t get into it here.
Building the Resource Server
stock-record, our resource server, serves as the gatekeeper to a collection of files which it provides in a RESTful manner. It maintains our data by only granting access to authenticated and authorized users. Here, I’ll share some of the key points that posed an interesting challenge while building the server.
Configuring the Spring Boot Apps
To configure Spring Boot for OAuth2, add the following dependencies to your pom.xml:
1
2
3
4
5
6
7
8
        <dependency>
            <groupId>org.springframework.boot</groupId>
            <artifactId>spring-boot-starter-oauth2-resource-server</artifactId>
        </dependency>
        <dependency>
            <groupId>org.springframework.boot</groupId>
            <artifactId>spring-boot-starter-oauth2-client</artifactId>
        </dependency>
While the client-starter isn’t strictly necessary, it does lay the groundwork for redirection to Keycloak when a service endpoint is accessed. Its suitability for production uses is up for debate—it’s certainly a convenience during development. As a general rule, you should never introduce into production any element that could potentially be exploited by an attacker.
Let’s delve into the spring-boot settings relevant for an OAuth2 app:
1
2
3
4
5
6
7
8
9
10
11
12
13
spring.security.oauth2.client.registration.stock_records.authorization-grant-type=authorization_code
spring.security.oauth2.client.registration.stock_records.client-id=stock-records
spring.security.oauth2.client.registration.stock_records.client-secret=<secret>
spring.security.oauth2.client.registration.stock_records.redirect-uri=http://localhost:8090/login/oauth2/code/stock-records
spring.security.oauth2.client.registration.stock_records.scope=openid, profile, roles, email

spring.security.oauth2.client.provider.stock_records.authorization-uri=https://auth.endeios.net/realms/endeios_net/protocol/openid-connect/auth
spring.security.oauth2.client.provider.stock_records.token-uri=https://auth.endeios.net/realms/endeios_net/protocol/openid-connect/token
spring.security.oauth2.client.provider.stock_records.jwk-set-uri=https://auth.endeios.net/realms/endeios_net/protocol/openid-connect/certs
spring.security.oauth2.client.provider.stock_records.user-info-uri=https://auth.endeios.net/realms/endeios_net/protocol/openid-connect/userinfo
spring.security.oauth2.client.provider.stock_records.user-name-attribute=preferred_username
spring.security.oauth2.client.provider.stock_records.issuer-uri=https://auth.endeios.net/realms/endeios_net
The first segment relates to the app itself, detailing its unique identity and attributes. The following section outlines how the server is set up. These settings correspond to my Keycloak instance which uses standard authentication and authorization links for OpenID. I find it useful to have these in this article as a reference, so I don’t need to remember them!
If you ever find yourself lost in the world of OAuth2 configurations, turn to the well-known services for guidance:
1
https://auth.endeios.net/realms/endeios_net/.well-known/openid-configuration
Setting up the web security
Thankfully, patching up web security is a thing of the past. We’ll be setting up ours in a more elegant, modern way:
1
2
3
4
5
6
7
8
9
10
11
12
13
14
15
16
17
18
19
20
21
22
23
24
25
26
27
28
29
30
31
32
33
34
35
...

@Configuration
@EnableWebSecurity
public class WebSecurity {
    ...
    @Bean
    public SecurityFilterChain securityFilterChain(HttpSecurity httpSecurity) throws Exception {

        JwtAuthenticationConverter jwtAuthenticationConverter = new JwtAuthenticationConverter();
        jwtAuthenticationConverter.setJwtGrantedAuthoritiesConverter(new KeycloakConverter());

        httpSecurity
                .authorizeHttpRequests(
                        authorizationManagerRequestMatcherRegistry -> {
                            authorizationManagerRequestMatcherRegistry
                                    .requestMatchers("/swagger-ui/**","/v3/api-docs**","/v3/api-docs/swagger-config").permitAll()
                                    .anyRequest().authenticated();
                        }
                )
                .oauth2Login(Customizer.withDefaults())
                .oauth2ResourceServer(configurer -> configurer.jwt(jwtConfigurer -> jwtConfigurer.jwtAuthenticationConverter(jwtAuthenticationConverter)));

    return httpSecurity.build();
    }


    @Bean
    public JwtDecoder jwtDecoder(OAuth2ClientProperties properties){
        OAuth2ClientProperties.Provider secretPagesProvider = properties.getProvider().get(app_name);
        return JwtDecoders.fromOidcIssuerLocation(secretPagesProvider.getIssuerUri());
    }
}
We have a custom mapper for authorities and the JwtDecoder is fed with the correct properties. Noteworthy is how swagger-ui is set as a public resource. Here’s an insight into how the authorities mapper works:
1
2
3
4
5
6
7
8
9
10
11
12
13
14
15
16
17
18
19
20
21
22
23
24
25
package org.endeios.stockrecords.config;

import org.springframework.core.convert.converter.Converter;
import org.springframework.security.core.GrantedAuthority;
import org.springframework.security.core.authority.SimpleGrantedAuthority;
import org.springframework.security.oauth2.jwt.Jwt;

import java.util.*;

public class KeycloakConverter implements Converter<Jwt, Collection<GrantedAuthority>> {
    @Override
    public Collection<GrantedAuthority> convert(Jwt source) {
        Collection<GrantedAuthority> roles = new ArrayList<>();
        for (String s : getRolesFor("stock-records", source)) {
            SimpleGrantedAuthority simpleGrantedAuthority = new SimpleGrantedAuthority(s);
            roles.add(simpleGrantedAuthority);
        }
        return roles;
    }
    public static List<String> getRolesFor(String appName, Jwt jwt) {
        Map<String, Object> resourceAccessClaim = jwt.getClaim("resource_access");
        Map<String, Object> appClaims = (Map<String, Object>) resourceAccessClaim.get(appName);
        return (List<String>) appClaims.get("roles");
    }
}
Testing the APIs
API testing requires hitting the endpoints with the correct bearer token. To obtain it, make a post to Keycloak. I created a helper class for this, but a classic curl command can serve the purpose just as well.
Building the Client Application
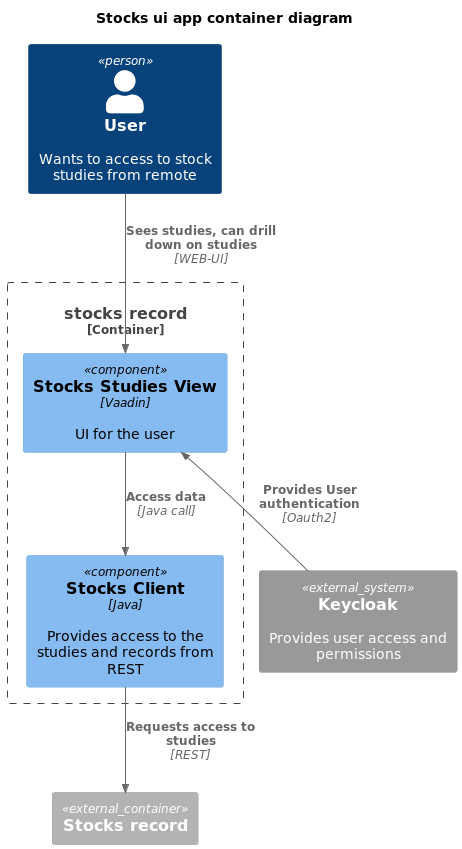
Our client application, stocks-ui, performs the vital task of visualizing studies. It displays the tickers of various stocks, their expected prices, the percentage changes, and their current prices. To deliver a robust GUI experience, it utilizes Vaadin, chosen out of both curiosity and a desire to avoid front-end implementation in JS or TS.
Dependencies
Chief dependencies include spring-boot-starter-oauth2-client and Vaadin, which we include in the pom.xml:
1
2
3
4
5
6
7
8
        <dependency>
            <groupId>org.springframework.boot</groupId>
            <artifactId>spring-boot-starter-oauth2-client</artifactId>
        </dependency>
        <dependency>
            <groupId>com.vaadin</groupId>
            <artifactId>vaadin-spring-boot-starter</artifactId>
        </dependency>
To set the Vaadin plugin for production builds, I opted for profiles:
1
2
3
4
5
6
7
8
9
10
11
12
13
14
15
16
17
18
19
20
21
22
23
24
25
26
 <profiles>
        <profile>
            <id>production</id>
            <properties>
                <vaadin.productionMode>true</vaadin.productionMode>
            </properties>
            <build>
                <plugins>
                    <plugin>
                        <groupId>com.vaadin</groupId>
                        <artifactId>vaadin-maven-plugin</artifactId>
                        <version>24.0.5</version>
                        <executions>
                            <execution>
                                <id>frontend</id>
                                <phase>compile</phase>
                                <goals>
                                    <goal>prepare-frontend</goal>
                                    <goal>build-frontend</goal>
                                </goals>
                            </execution>
                        </executions>
                    </plugin>
                </plugins>
            </build>
        </profile>
For integration tests targeting my internal endpoint, I made a special tag that is disabled by default:
1
2
3
4
5
6
7
8
9
10

            <plugin>
                <artifactId>maven-surefire-plugin</artifactId>
                <groupId>org.apache.maven.plugins</groupId>
                <version>3.1.2</version>
                <configuration>
                    <excludedGroups>integration</excludedGroups>
                </configuration>
            </plugin>
Integrating OAuth2 and Setting Up Vaadin
Being a UI app, certain configurations are necessary:
1
2
3
4
5
6
7
8
9
10
11
12
13
spring.security.oauth2.client.registration.endeios_net.client-id=stocks-ui
spring.security.oauth2.client.registration.endeios_net.client-secret=<secret>
spring.security.oauth2.client.registration.endeios_net.authorization-grant-type=authorization_code
spring.security.oauth2.client.registration.endeios_net.scope=openid, profile, roles, email
spring.security.oauth2.client.registration.endeios_net.redirect-uri=http://localhost:8088/login/oauth2/code/stocks-ui

spring.security.oauth2.client.provider.endeios_net.authorization-uri=https://auth.endeios.net/realms/endeios_net/protocol/openid-connect/auth
spring.security.oauth2.client.provider.endeios_net.token-uri=https://auth.endeios.net/realms/endeios_net/protocol/openid-connect/token
spring.security.oauth2.client.provider.endeios_net.jwk-set-uri=https://auth.endeios.net/realms/endeios_net/protocol/openid-connect/certs
spring.security.oauth2.client.provider.endeios_net.user-info-uri=https://auth.endeios.net/realms/endeios_net/protocol/openid-connect/userinfo
spring.security.oauth2.client.provider.endeios_net.user-name-attribute=preferred_username
spring.security.oauth2.client.provider.endeios_net.issuer-uri=https://auth.endeios.net/realms/endeios_net
One notable point in web security: you need to extend Vaadin web security as shown below. No other settings were required to set up Vaadin’s security.
1
2
3
4
5
6
7
8
9
10
11
12
13
14
15
@Configuration
public class WebSecurity extends VaadinWebSecurity {
    @Override
    protected void configure(HttpSecurity http) throws Exception {
        super.configure(http);
        http.oauth2Client(Customizer.withDefaults())
                .oauth2Login(Customizer.withDefaults());
    }

    @Bean
    public JwtDecoder jwtDecoder(OAuth2ClientProperties properties) {
        OAuth2ClientProperties.Provider secretPagesProvider = properties.getProvider().get("endeios_net");
        return JwtDecoders.fromOidcIssuerLocation(secretPagesProvider.getIssuerUri());
    }
}
Within the controller, the token is managed as follows, making use of a self-made class for interaction with the client. I chose this route to avoid using the usual rest-template, although it would have been a viable alternative. The relevant code, which includes Vaadin page setup, is as follows:
1
2
3
4
5
6
7
8
9
10
11
12
13
14
15
16
17
18
19
20
21
22
23
24
25
26
27
28
29
30
31
32
33
34
35
36
37
38
39
40
41
42
@Route("")
@PageTitle("Stocks")
@PermitAll
public class StudiesView extends AppLayout {

    ...

    private final StocksClient stocksClient;
    private final OAuth2AuthorizedClientService clientService;

    ... ui stuff ...

    public StudiesView(StocksClient stocksClient, OAuth2AuthorizedClientService clientService) {
        this.stocksClient = stocksClient;
        this.clientService = clientService;
        authentication = SecurityContextHolder.getContext().getAuthentication();
        principal = (OAuth2AuthenticatedPrincipal) authentication.getPrincipal();
        createHeader();
        createGrid();
        createDrawer();
    }

    private String getToken() {
        OAuth2AuthenticationToken oAuth2AuthenticationToken = (OAuth2AuthenticationToken) authentication;
        OAuth2AuthorizedClient client = clientService.loadAuthorizedClient(oAuth2AuthenticationToken.getAuthorizedClientRegistrationId(), oAuth2AuthenticationToken.getName());
        return client.getAccessToken().getTokenValue();
    }

    private Button addTabFor(String studyId) {
        ... ui settings ...
        button.addClickListener(buttonClickEvent -> populateGridWithStocksFrom(studyId));
        return button;
    }

    private void populateGridWithStocksFrom(String studyId) {
        TickerEntry[] items = stocksClient.getStudyResultById(getToken(), studyId).getResult();
        List<Stock> stocks = Arrays.stream(items)
                .map(TickerEntry::getStock)
                .collect(Collectors.toList());
        this.grid.setItems(stocks);
    }
}
As always, focus on making informed decisions about the tools and libraries you use. They can greatly affect the security and performance of your applications.
At the time of writing, vaadin needs java 167 in order to compile.
Validating Our Application
Having reached this stage, it’s time to launch the apps and conduct an overarching review. I’m pleased to report – they work immaculately! To assist readers in their journey, I’ll supply the necessary zip files and some test data.
Looking Back and Looking Forward
Embarking on this project was indeed a voyage filled with discovery and understanding. Unexpectedly, it consumed more time than I had initially estimated. However, the most time-intensive aspect wasn’t the coding itself but comprehending precisely what to write and establishing the correct configurations.
This experience only furthers the belief that building a secure OAuth2 application with Spring Boot involves more than just understanding the technology. It requires critical thinking, problem-solving, and a keen attention to detail.
This undertaking has not only fortified my knowledge but also created a pathway for others to tread upon. My hope is that this article has simplified the otherwise complex nuances of implementing OAuth2 in your applications.
Remember, the field of programming is ever-evolving, and there is always room for improvement. So keep exploring, keep learning, and keep innovating! Whether you’re a seasoned developer or just starting your journey into the world of coding, each challenge you tackle, big or small, contributes to your growth and success.
Thanks to ML enhancements, this article has undergone thorough editing for a smooth reading.